

By Emily Malloy
“I must have flowers always and always.”
These words of Claude Monet pierce my heart because they ring true. The culmination of Monet’s work was highlighting the beauty of God’s creation.
Encountering varying temperaments of people in my life, I have yet to meet a person who did not like flowers. It was always such a joy watching a person change as the flower shop door swung open. The sight and scent of a flower does something to a person. It changes their posture, their demeanor. A sigh. A feeling of comfort. Looks of wonder would cross his or her face as the senses would awaken as the walk took them deeper into the shop.
Flowers bring about awe because of their delicate and beautiful nature. The God that created this marvel views me as the pinnacle of creation—what joy!
I am a strong advocate of having fresh flowers in the home. It is taking that little piece of wonder and bringing it into your cherished space. As flowers have a way of enhancing every occasion (think of the happiness that comes to a hostess’s face as you present her with a bouquet or the delight taken in a floral centerpiece at dinner), it seems only right that we take the time to bring this joy into our own lives, as well as others’ lives, as often as possible!
“I don’t have an artistic bone in my body,” is a phrase I often hear. All that it takes is some time and know how, and I promise you’ll be creating beautiful arrangements. I wasn’t always a florist. For most of my life, I never saw myself as a creative individual. I mention this because if I have been able to take this time-treasured craft and make it my own, so can you.

Easter is such a joyous occasion that is often celebrated in flowers. Hallelujah! So, it seems only right that we begin our fun and learning together discussing a way to take a piece of God’s gloriously redeemed creation and make it the focal of our Easter dinner tables. It may seem like an overwhelming undertaking at first, but I promise, you don’t need much to succeed. We will be going over two different ways of florally celebrating: by way of a traditional centerpiece and the newly popularized table garland.

The items you need to complete a centerpiece are really truly simple: (1) vase, container, or vessel of some sort that can hold water, (2) pruning shears, snips, or even kitchen scissors, if that is all you have... although I would recommend purchasing shears or snips, as they are sharp and, consequently, gentler on the stems, (3) water, (4) flowers. It’s so very simple!
Determining which vessel you would like to use for your arrangement will determine the quantity of blooms you will need to execute the design. There are so many different containers that can be used and can present an exciting challenge (for example cigar boxes or china bowls are tremendously fun to arrange in, but require slight modifications to pull it off). The most common containers used: traditional glass round or rectangle containers, mason jars, pickle jars, or even a can!
I created a great PDF that you can spruce up any jar or can and celebrate the Resurrection in a sweet way! All you have to do is print it, trim it to size, and tape it to your vase! Print here.

Before we dive into the fun, I want to touch upon the main reason for difficulty in floral design: stem length. Either the stems are too long, and not trimmed to size, and look shapeless in the vase, or they are cut way too short and fall into the vase, consequently looking shapeless as well. The best way to avoid this mistake is to hold the flower up to the vase in the exact placement and trimming the stem accordingly. Remember: you can always make the stem shorter, but you cannot make the stem regrow, so trim carefully! After placing the bloom into the arrangement, you can easily remove it and trim it shorter, if need be.
Now, we will break the tutorials down into two parts the first will be the traditional centerpiece (shown in a few different vessels), the second will be the table garland.
The first step in understanding floral design is getting to know your ingredients (as is the same in baking and cooking) and sourcing them. The folks in my life know that foraging is my favorite way to source flowers, and I have planted gardens to be able to fulfill this passion. I could talk endlessly on the tips and tricks to successful foraging, but we will keep things focused today. Moreover, isn’t everybody’s passion to create a cutting garden (or perhaps outdoor space is an issue) or go traipsing in open areas to harvest. The other ways of sourcing blooms: grocery stores, floral shops, or direct from the flower farmer!
Almost as Delicious as Pie: the Floral Ingredients
Next, it’s helpful to understand the ingredients and how they play a role in the development of arrangement shape, the simple break down:
(1) Greenery/Foliage to give structure/shape and create “nests” for focal blooms to reside:
-examples of greenery can be from any bush you find in your yard, i.e. Holly, ninebark, raspberry bush stems, boxwood, evergreens, viburnum, laurel, and so much more...
(2) Texture to add dimension and personality to the arrangement:
-examples of texture: ivy, basil, hypericum berries, eucalyptus, honeysuckle, pieris, nastartum, rose hips, mint, and so much more...
(3) Focal flowers are the flowers that are showcased in the arrangement that contain larger heads and are the standout blooms:
-examples of focal flowers are: hydrangea, rose, peony, lily, kale, dahlia, larger daffodils, and the list could go on for ages..
(4) Second round of texture of supporting flowers, usually smaller blooms, often with multiple flowers on a stem, but will be added in clusters to finish out the arrangement:
-examples of supporting flowers: ranunculus, small daffodils, zinnias, cosmos, alstroemeria, coneflower, yarrow, gomphrena, and so much more..
(5) Last touch accents can be added at the end to create a lightness to the arrangement. I am a big fan of this layer in arrangements, but it isn’t always necessary!:
-examples of these airy accents: false Queen Anne’s lace, heuchera, columbine, grasses, black eyed susan, feverfew, and so much more..
There are endless examples of flowers and greens that could fall into each category, so often a visual can be most helpful when looking for certain flowers to fill out an arrangement. I went foraging to select great visual examples of what these ingredients look like. Sometimes supporting flowers can take the main stage, depending upon the size and the groupings of flowers. I also show this same grouping of flowers in action within a hand-tied bouquet underneath!


**Note: Speaking from experience, so often we acquire more flowers than we need to design. Putting too many flowers into an arrangement can make the flowers overcrowded and not able to shine! I am an overzealous flower gatherer, so I have often overstuffed my arrangements and had to go back and edit out some of the flowers to create a looser, less crowded arrangement.

Now that you can visualize the ingredients, let’s put together a floral arrangement using blooms I purchased at the grocery store (I cut greenery from bushes in the yard: pittosporum/cheesewood and boxwood). Additionally, I am using hydrangea, daffodils, and carnations to put together my simple, but elegant Easter centerpiece.
Part 1: Simple Table Centerpiece Arrangement

(1) Fill your vase to nearly the brim with water.
(2) Take your greenery and place the stems around the edge of the vase opening at varying heights to create a structure. (I often like to think of an off-center triangle when forming a shape). It is great to have some of your structural pieces to graze the lip of the vase). You’re building the base layer and primary structure of your arrangement. We won’t be going too tall since this will sit at the center of the table and it’s good for those sitting around the table to not have their vision blocked by a too-tall centerpiece.
(3) Taking note of the gaps and nests in your greenery, this is the time to fill in with your first layer of texture, if you have a few options to work with. If not (like me), no worries—we will skip to the focal blooms and continue to fill out from there. Now, look for a place to place your focal bloom(s), more toward the front of the arrangement (I am using a large headed hydrangea as my focal in this instance). I used one large focal bloom in this arrangement because the head of the hydrangea was so large. Most often, unless working with large headed blooms, you will be using a bunch of focal blooms (as often flowers are available to buy in bunches), you work from the center of the arrangement outward in your floral placement (reference the hand-tied bouquet above for an example). Cut stems at varying heights to create lots of depth and interest.
(4) Now we add in the second round of textural elements (as in this case, it is my first round since I was working with such a large hydrangea). As you’ll see from the fourth box in the image, I have a leggy carnation to work with. One great thing about many textural elements is that they are branchy and each stem can be separated into multiple new stems, as highlighted in the photo.

(5) Place the textural flowers around the focal stem(s) to highlight, while also filling in any holes.
(6) I like to pause after this round of texture and do a full 360* survey of the arrangement—how does the top look? The reverse side? Are there holes? Did I accidentally not place a stem into water? It’s a good time to pause and take in what you have so far and do any editing/move flowers around to new spots at this point.
(7) I had two rounds of supporting flowers for this arrangement (tulips). At this point, working in pairing the flowers into groupings of two and three, I begin to place the tulips into the arrangement, creating a new depth to the design, working my way around all 360* of the vase.
(8) Take a step back to take in your design. Are all holes filled in? Is there enough varied depth? If you have any airy elements (I used some in the hand-tied bouquet above, but not for this more simple design), now is the time to add it in and add some fun personality to the design.

(9/10) Enjoy the work of your hands! And do any last-minute edits once you see your arrangement on the set table!
Now that you are all professionals, I am sharing a bonus grid (this time without words) showing two other variations of vessels and blooms for an Easter centerpiece.


Part 2: Showstopping Floral Table Garland

There is something jaw-dropping and grand about a floral garland lining a table. They are absolutely beautiful and not difficult to create. The only caveat is that these blooms are arranged out of water and are not able to be done too far in advance (to play it on the safe side depending upon the weather and which flowers are used, I’d arrange no sooner than 1 hour before sitting down to eat).
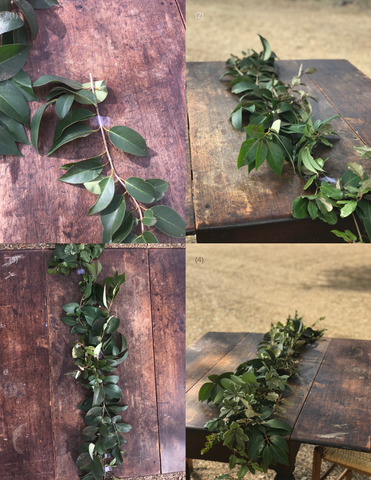
(1) Take your longest, most structured greenery stems and create a line down the center of the table. Depending upon the table’s width, it might be the width of a single stem (it helps to have at least one place setting in place to gauge size). I was working outside on a blustery day, so I had to use tape to secure this first round of stems on the table, so that they wouldn’t continue to blow away! In this garland, I used privet berry stems, pittosporum, and boxwood (as well as an unidentified vine I stumbled upon).
(2) Working down the length of the table, arrange your stems, so that the branchy end of one stem is gently tucked under the leaves of another.
(3) I love the look of layered greens within a table garland, so this is a great opportunity to place layered greenery to really fill it out and create depth. If you stumble upon any sort of ivy type stems, this is a great time to tuck them in.
(4) Continue on tucking into any gaps in the greenery with additional stems that you have already used, or you can continue tucking in another layer of greens.

(5) Once you have a great foundation of structure by way of greenery, now is the time to add our floral texture. I used varieties of daffodils to create this interest. Utilizing the clustering technique, create little groupings of these flowers and tuck them in and throughout the greenery base.
(6) Continue up and down the garland, tucking these clusters into holes and dark spots in the greenery. You can utilize different kinds of texture in this step, and not just one bloom type, when building out the personality of your garland.
(7) Once you have completed the layer of texture, it is time to add your focal blooms. I used tulips, but any focal bloom will do!
(8) As you did with the greenery layers and texture layers, continue up and down the garland filling in holes and establishing depth and personality to your garland.
